Wardrobe Project Update - Building The Shoe Display Unit
Today I'd like to share an update on my wardrobe project. You can read all about this project here and here.
The first step in re-vamping my wardrobe was to carry out a good ol' spring clean, and charity-ise a whole pile of shoes that I never wear, leaving me with the ones that I really love. The next step was to build a Christian Louboutin Parisian boutique-inspired customised shoe display and storage unit.
Here's how things looked when we started out:

Before we hit up B&Q, I sketched out the design for the unit and worked out how many pieces of MDF we would need. You can check out the plan here.
Having procured the materials, I measured and marked up all the pieces, and handed them over to Andre for jigsawing purposes:
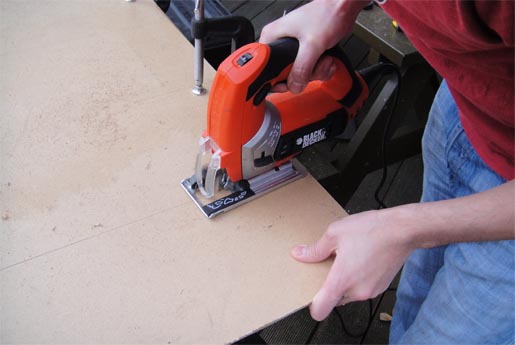
Effectively we created our very own Ikea-style flatpack - I even marked each piece of wood before cutting it with a letter from A-M so we knew which piece went where. Actually that's a completely essential thing to do, because otherwise you'll end up with a random pile of pieces and no clue how to fit them together. It's also sensible to mark which side is the upper side, and which is the front and the back.
Here are a couple more tips to pass along for anyone who fancies making their own unit. We designed ours to fit inside a wardrobe - a wardrobe that turned out to not be completely square. It measured something like 104cm along the front, and 105cm along the back. So make sure you measure all areas of whatever will contain your unit, and factor this in when you mark up the wood prior to cutting.
A second tip is to ensure you take into account that the jigsaw blade will use up 1-2mm of your wood as it cuts, so make each piece slightly longer/wider than you need. You can always sand it down if it's a bit too large.
Having cut the wood, we connected the unit together using invisible pins. Our wood pieces were 6mm wide, so conventional dowel connectors wouldn't work as they would have been too big. We played around with various options, and eventually bought a bag of thin nails, and cut the heads off them to create our own custom invisible pins. We also used invisible shelf supports (carving out a small area from underneath each shelf to ensure that the shelf would sit nice and flush on the supports):

Here's how the unit looks inside the wardrobe:

And here's how it looks with my shoes in place:

It's kind of like having my own shoe shop. Sweet.
But we're not even close to being finished yet - this is just the beginning.... Next steps are to paint the unit, and then wallpaper the inside of the wardrobe. Then I will be ready to actually display my shoes on the unit, rather than just pushing the boxes in any old how.
Watch this space!
How do you store your shoes?