DIY Kitchen Survival Guide - Creating An Inspiration Board (Step 1 of 10)
Hold onto your hats, peeps! I am finally ready to share the first step in my DIY Kitchen Survival Guide – creating an inspiration board.
For the benefit of those of you who have recently discovered this Nest, the idea behind this guide is that after having somehow managed to survive the two month period when our kitchen pretty much looked like this…

And our living room looked like this…

….I decided to share a 'DIY Kitchen Survival Guide' with you all to explain how we managed to DIY every single inch of our kitchen installation without developing a pathological hatred of kitchens that would compel us to eat take-away for the rest of our natural lives.
The DIY Kitchen Survival Guide has ten steps, which you can read about in more detail here:
1. Create an inspiration board
2. Work out a maximum budget
3. Design the layout
4. Choose your suppliers
5. Buy everything
6. Write a project plan
7. Set up an alternative kitchen
8. Carry out the installation
9. Survive the installation
10. Invite everyone you have ever met to come over to make suitably admiring comments.
Today, I’m going to cover the first step – creating an inspiration board.
This is a really key first step to ensure that you have a clear vision of the kind of kitchen you want, and that the people you live with who may, or may not, be allowed to provide input to the kitchen design understand what you have in mind.
Also, if you know what kind of style you want from the start, this can help to avoid the cost that comes with changing your mind mid-installation.
There are basically two ways to create an inspiration board – either retro-style (with images ripped out of magazines, scissors, and glue) or tech-style (with images gleaned from the tinternet, plus Photoshop).
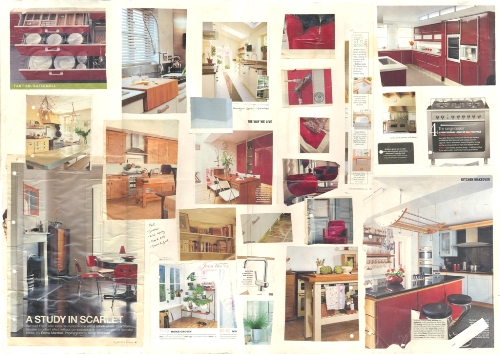
The inspiration board I created for our kitchen was done retro-style , with paper, scissors and glue. It’s quite large (around 110cm x 80cm) because it’s made of four A3 sheets stuck together with sticky tape:

You can view a larger image of it here and read some more about how I created it here:
If I were to create an inspiration board for the kitchen today, I would do things differently. First of all, I would go tech all the way.
I do still love covering myself in glitter and glue, and get slightly giddy just at the thought of the third floor of the Paperchase in Manchester where they sell their glorious handmade papers, but I just find it easier to create inspiration boards on my laptop because these days I find so much more inspiration online – it’s definitely where the best pictures are to be found.
Secondly – I’ve come to realise that the inspiration board I created for the kitchen is not really an ‘inspiration’ for the design – it’s more a shopping list of exactly what I wanted to buy. Our stainless steel range cooker, contemporary mixer tap, glossy red units, ceramic Belfast sink – they’re all right there on the inspiration board.
Really, an inspiration board should be just that – a collection of images that inspire the overall style, rather than a shopping list of things that you want to buy in order to create the style.
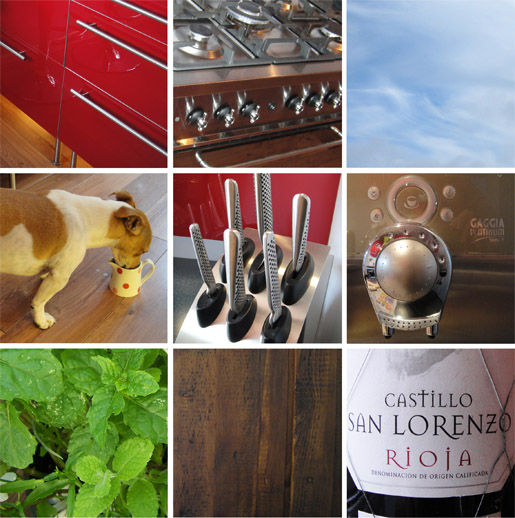
With this theory in mind, I set about designing the inspiration board that I might have created for our kitchen if I had used this approach. Here’s how it turned out:

All photos taken within the Nest
I use this model for creating all my inspiration boards – nine square images, with white lines between them to create a clean, crisp feel. I use Photoshop to create mine – but you can also use Microsoft Picture Manager and PowerPoint if you don’t have access to Photoshop. I’ll post a tutorial on how to do this at some stage in the not too distant future.
Here’s how the inspiration board breaks down. You can skip this part if analysis isn’t your thing :-)
The photo of the red kitchen brings in the key colour (red) and style (sleek and contemporary). The picture of the range cooker with the gas rings is intended to demonstrate that this is a kitchen where some serious cooking will take place – it can’t just be pretty, it also has to be functional.
The picture of the sky introduces the second key colour (light blue), and also indicates that the kitchen must somehow link between indoors and outdoors (as it opens onto the garden), and that it should have a clean, light, open feel.
The picture of Penny, my sweet little Jack Russell (you can meet her here) happily drinking out of the milk jug demonstrates that this is a kitchen where dogs are going to be running in and out, and where things are going to be spilled on the floor – so again, it needs to be highly functional and practical.
The Global knives again give the message that this is a kitchen where some serious cooking will be taking place – but that it must be as stylish as it is practical. The Gaggia shows that we want our kitchen to be somewhere where we can perch on a bar stool and drink an espresso in the morning – and that we like our gadgets!
The picture of the mint in the bottom left hand corner again represents cooking, and also the link between indoors and outdoors. The reclaimed, aged wood shows that the style must not be completely contemporary, but must balance rustic and modern elements.
And finally, the wine label suggest that this is a sociable kitchen where friends will gather to share a few glasses of wine – not to sit down and have a meal, because it’s not a kitchen-diner – but to stand around informally, perching on the bar stools, or leaning against the cabinets.
I’m going to finish up by posting three images together – the inspiration board, the shopping list, and the actual kitchen:

You can read more about our kitchen installation here and see some before and after photos here.
So what do you think? Do any of you guys make inspiration boards? If so, do you go retro or tech style? Which websites/blogs do you use to source inspiring images? Do you prefer to create a high level vision, or more of a shopping list? Do you use Photoshop, or other software?
I’ll be back tomorrow to share some more adventures from the Nest. In the meantime, please feel free to take a little tour – you can peep into our Nest here.
xoxo